Building My Dream Raspberry Pi Arcade Machine Kit: A Personal Journey into Retro Gaming
As a lifelong gaming enthusiast, I’ve always been captivated by the nostalgia of classic arcade games. The thrill of inserting a quarter, the satisfying click of the joystick, and the colorful pixelated graphics all transport me back to a simpler time. Recently, I stumbled upon something that reignited that passion in me: the Raspberry Pi Arcade Machine Kit. This incredible little device not only allows me to relive those cherished gaming moments but also empowers me to build my own arcade machine from scratch. With its compact design, affordability, and endless customization options, the Raspberry Pi Arcade Machine Kit has turned my living room into a retro gaming paradise, blending the charm of yesteryears with the innovation of modern technology. Join me as I explore the fascinating world of DIY arcade gaming and discover how this tiny powerhouse can transform your gaming experience!
I Explored The Raspberry Pi Arcade Machine Kit Personally And Shared My Honest Insights Below
Hikig 2 Player led arcade buttons and joysticks DIY kit 2x joysticks + 20x led arcade buttons game controller kit for MAME and Raspberry Pi – Red + Blue Color

Vilros Raspberry Pi 4 Complete Starter Kit- Includes Raspberry Pi 4 Board, Fan Cooled Case, 64GB Preloaded Micro SD Card and More (4GB, Clear Transparent Case)

Easyget New Updated 2-Player LED DIY Arcade Kit 2X Zero Delay USB Encoder + 2X Joystick + 20x LED Arcade Buttons for PC, Windows, MAME, Raspberry Pi Arcade DIY (2-Player, White Kit)
1. GRS Build-A-CADE – 1:6 Scale Arcade Cabinet kit for use with Raspberry Pi

I recently came across the GRS Build-A-CADE, a 16 Scale Arcade Cabinet kit designed specifically for use with Raspberry Pi, and I must say, I’m thoroughly impressed. As a retro gaming enthusiast, I appreciate the blend of nostalgia and modern technology that this product offers. The GRS Build-A-CADE is not just a kit; it’s an invitation to relive the classic arcade experience right in the comfort of my own home, and I believe it can do the same for many others who share a passion for gaming.
One of the standout features of this kit is its easy-to-assemble parts. I often find DIY projects daunting, but the GRS Build-A-CADE comes with precisely molded components made from high-quality materials. The detailed instruction manual provided is a game-changer. It guides users through the assembly process step-by-step, ensuring that anyone, regardless of their technical skills, can put it together successfully. This accessibility makes it perfect for families and individuals who want to bond over a fun project or for those who simply want to jump into the gaming action without a steep learning curve.
The 4.3-inch vertical IPS screen is another highlight that enhances the gaming experience. The vibrant colors and sharp visuals of the screen bring classic games to life, making every pixel pop. Additionally, the support for HDMI output means that I can easily connect it to a larger screen for an even more immersive gaming experience. This flexibility allows me to enjoy my favorite games in a way that feels both nostalgic and fresh, appealing to both my inner child and my current gaming preferences.
Moreover, the rich assortment of controller accessories included with the kit is impressive. This feature allows me to customize my gaming setup according to the types of games I want to play. Whether I’m feeling like diving into a fast-paced shooter or indulging in a classic platformer, I can switch up the controllers to suit my needs. This versatility is a significant advantage, as it enhances the overall gaming experience and keeps it engaging over time.
A particularly practical feature of the GRS Build-A-CADE is the built-in large capacity battery. It’s refreshing not to have to purchase an additional power supply for my Raspberry Pi. This convenience means I can set up my arcade cabinet anywhere in my home without worrying about finding an outlet nearby. The battery provides ample power for hours of fun, making it perfect for both solo gaming sessions and entertaining friends during gatherings.
It’s important to note that the kit is compatible with Raspberry Pi models 3 and 4, but does not include the Raspberry Pi board itself. This means that while I will need to source the Raspberry Pi separately, the investment in this kit is still worthwhile. It offers an engaging way to utilize the Raspberry Pi, transforming it into a functional arcade cabinet that can bring joy to gamers of all ages.
the GRS Build-A-CADE is not just a product; it’s a gateway to a world of nostalgia and fun. With its user-friendly assembly, stunning display, customizable controls, and convenient battery, this kit is an excellent choice for anyone looking to dive into retro gaming. If you’re like me and enjoy the thrill of arcade games, I highly recommend considering this kit. It’s an investment in fun, creativity, and a wonderful way to relive classic gaming moments. Don’t miss out on the opportunity to create your own arcade experience!
Feature Description Easy to Assemble Parts High-quality materials with a detailed instruction manual for effortless assembly. 4.3-inch Vertical IPS Screen Vibrant display with HDMI output support for a larger viewing experience. Rich Controller Accessories Customizable controls to fit various game types for an enhanced experience. Built-in Large Capacity Battery No need for an additional power supply; portable and convenient for gaming. Compatibility Works with Raspberry Pi 3 or 4; Raspberry Pi board not included.
Get It From Amazon Now: Check Price on Amazon & FREE Returns
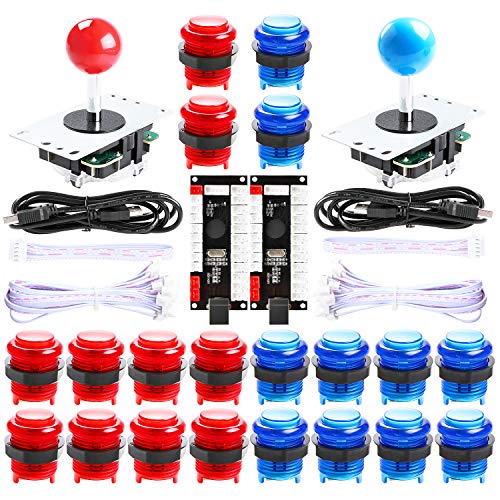
2. Hikig 2 Player led arcade buttons and joysticks DIY kit 2x joysticks + 20x led arcade buttons game controller kit for MAME and Raspberry Pi – Red + Blue Color
As a gaming enthusiast, I find the ‘Hikig 2 Player LED Arcade Buttons and Joysticks DIY Kit’ to be an incredibly appealing product for anyone who has ever dreamed of building their own arcade console. The vibrant red and blue colors of the kit not only make it visually striking but also add a nostalgic touch that resonates with the golden age of arcade gaming. This DIY kit is perfect for those who love to tinker and customize their gaming experience.
One of the standout features of this kit is its compatibility with MAME (Multiple Arcade Machine Emulator) and Raspberry Pi, which means I can easily create a retro gaming console that plays all my favorite classic games. The two-player setup is ideal for gaming sessions with friends or family, fostering a sense of camaraderie and competition that is often missing in modern gaming. The kit comes with two joysticks and twenty LED arcade buttons, offering plenty of options for customization and allowing me to tailor my setup to my personal preferences.
The inclusion of a 100% zero-delay encoder is another impressive aspect of this kit. I appreciate that it works seamlessly across all Windows systems, ensuring that I won’t face any connectivity issues when setting up my arcade. This reliability is crucial for maintaining an immersive gaming experience, as lag can significantly detract from the fun. The ease of installation is a significant plus point, especially for those who might not have extensive technical knowledge. I can dive right into assembling my arcade console without worrying about complicated setups.
Moreover, the materials used in this kit are of high quality, with components made from high-temperature resistant plastic. This durability ensures that my arcade buttons and joysticks will withstand hours of enthusiastic gameplay. The LED lights add a fantastic visual element, enhancing the overall aesthetic of my DIY arcade machine. As someone who enjoys both gaming and crafting, I find the combination of these features to be compelling and exciting.
the ‘Hikig 2 Player LED Arcade Buttons and Joysticks DIY Kit’ is an excellent choice for anyone looking to create a personalized gaming console. Whether I’m a seasoned gamer or a casual player, this kit provides the perfect opportunity to relive the nostalgia of arcade gaming in the comfort of my home. The ease of use, quality materials, and zero-delay technology make it a worthwhile investment. If you’re considering building your own arcade setup, I wholeheartedly recommend this kit. It’s not just a product; it’s a gateway to countless hours of fun and creativity!
Feature Description Compatibility MAME and Raspberry Pi Setup 2-player configuration Components 2 Joysticks, 20 LED Arcade Buttons Encoder 100% Zero Delay Material High temperature resistant plastic Installation Easy setup process
Get It From Amazon Now: Check Price on Amazon & FREE Returns
3. Vilros Raspberry Pi 4 Complete Starter Kit- Includes Raspberry Pi 4 Board Fan Cooled Case, 64GB Preloaded Micro SD Card and More (4GB, Clear Transparent Case)
As someone who has explored various tech products and starter kits, I am genuinely excited to share my analysis of the Vilros Raspberry Pi 4 Complete Starter Kit. This kit is an excellent choice for both beginners and experienced tech enthusiasts who want to dive into the world of Raspberry Pi. It includes everything necessary to get started, making it a comprehensive solution that can help you unleash your creativity and build amazing projects.
The heart of this kit is the Raspberry Pi 4 Model B Board, a powerful mini-computer that boasts impressive performance capabilities. With 4GB of RAM, it can handle multitasking and run complex applications smoothly, making it ideal for projects ranging from programming and web development to media streaming and gaming. The preloaded 64GB micro SD card containing the Raspberry Pi OS ensures that you won’t waste time setting up your system; you can jump right into your projects.
One of the standout features of this kit is the inclusion of a well-designed fan-cooled case. Not only does this case provide a stylish transparent exterior, but it also offers essential passive and active cooling. The built-in fan and included heatsinks work together to keep your Raspberry Pi board cool, preventing overheating during intensive tasks. This is particularly important for users who plan to run their Raspberry Pi for extended periods or engage in resource-heavy projects.
Additionally, the kit includes a range of convenient accessories that enhance the overall user experience. The Vilros power supply, featuring an inline on/off switch, makes it easy to control power without unplugging the device. The Micro HDMI to Standard HDMI cable (5ft) ensures that you can connect your Raspberry Pi to a monitor without any hassle. The neoprene storage bag is a thoughtful addition, allowing you to keep all components organized and protected when not in use. And let’s not forget the updated QuickStart guide, which provides clear and concise instructions tailored specifically for the Raspberry Pi 4, making it easy for even the most novice users to get started.
While the kit does not include a keyboard, mouse, or monitor, this is a minor consideration given the comprehensive nature of the rest of the package. Most users likely already have these peripherals or can easily obtain them. This starter kit truly empowers you to explore and learn about programming, electronics, and much more.
Overall, the Vilros Raspberry Pi 4 Complete Starter Kit represents a fantastic value for anyone looking to embark on their Raspberry Pi journey. It combines essential components, thoughtful accessories, and user-friendly features that make it an ideal choice. I wholeheartedly recommend this kit to anyone interested in technology, programming, or DIY projects. The possibilities are endless, and with this kit, you have everything you need to start creating your own innovative solutions. Don’t miss out on this opportunity to elevate your skills and knowledge; invest in this starter kit today!
Feature Description Raspberry Pi 4 Model B Board Powerful mini-computer with 4GB RAM for multitasking and complex applications. Fan-Cooled Case Well-vented case with a built-in fan and heatsinks to prevent overheating. 64GB Preloaded Micro SD Card Comes with Raspberry Pi OS preloaded for easy setup. Power Supply Includes an inline on/off switch for convenient power control. Micro HDMI to Standard HDMI Cable 5ft cable to connect to monitors easily. Neoprene Storage Bag Protects and organizes all components when not in use. Heatsinks Set of 4 heatsinks with thermal stickers for easy application. QuickStart Guide Updated guide for easy setup and usage of Raspberry Pi 4.
Get It From Amazon Now: Check Price on Amazon & FREE Returns
4. Easyget New Updated 2-Player LED DIY Arcade Kit 2X Zero Delay USB Encoder + 2X Joystick + 20x LED Arcade Buttons for PC Windows, MAME, Raspberry Pi Arcade DIY (2-Player, White Kit)
As someone who has always had a passion for gaming and DIY projects, I am genuinely excited to dive into the details of the Easyget New Updated 2-Player LED DIY Arcade Kit. This kit is not just a collection of parts; it’s an opportunity to create a personalized gaming experience that resonates with nostalgia for classic arcade games while introducing modern convenience and functionality. For anyone who enjoys retro gaming or wants to build their arcade machine, this kit is an excellent choice.
One of the standout features of this kit is the 2020 New Version Zero Delay USB Encoder. It supports all Windows systems, including older versions like Windows XP and newer iterations up to Windows 10. This universal compatibility means that I can use this kit on a wide array of devices without worrying about technical glitches or outdated software. The zero delay aspect is particularly appealing. As a gamer, I understand how crucial it is to have immediate response times, and this encoder guarantees that I can enjoy seamless gameplay without lag. This is a game-changer for anyone looking to replicate that authentic arcade experience at home.
The kit comes with two professional 4/8 way switchable arcade joysticks. The 35MM ball top handle is not only stylish but also ergonomic, ensuring comfort during extended gaming sessions. I’ve spent countless hours playing arcade games, and having a quality joystick can make a significant difference in gameplay. Whether I’m playing classic titles or new indie games, the joystick’s responsiveness will enhance my overall gaming experience.
Another highlight is the innovative design of the LED arcade buttons. With 20 vibrant options included in the kit, I can create a visually stunning arcade machine that truly reflects my style. The plug-and-play nature of these buttons means I won’t have to wrestle with complex wiring. This simplicity is a breath of fresh air for someone like me who loves to tinker but might not be an electrical engineer. I can focus on enjoying the build process rather than getting bogged down with technicalities.
Furthermore, the kit is designed to support more LED devices with its 3x 5V power output design. This flexibility allows me to expand my setup as I see fit. Whether I want to add more buttons or integrate additional LED features, the possibilities are endless. This adaptability is particularly attractive for those of us who enjoy customizing our gaming experience.
In terms of aesthetics, the kit offers some of the most popular colors for arcade DIY projects. The vibrant LEDs can transform my gaming setup into an eye-catching centerpiece that not only functions well but looks fantastic. I can already envision how my friends and family will be impressed when they see the finished product, and I can’t wait to challenge them to a gaming duel!
In summary, the Easyget New Updated 2-Player LED DIY Arcade Kit is a fantastic investment for anyone who cherishes the joy of gaming and appreciates the art of building their own machines. With its robust features, ease of use, and endless customization options, I feel confident in recommending this kit to fellow gaming enthusiasts. It’s not just about playing games; it’s about crafting an entire experience that I can proudly call my own.
If you’re looking to elevate your gaming experience and have a blast doing it, this kit is an ideal choice. Don’t miss out on the chance to build something unique and enjoy countless hours of fun!
Feature Description Zero Delay USB Encoder Supports all Windows systems with no lag in response times. Professional Joysticks 4/8 way switchable with comfortable 35MM ball top handle. LED Arcade Buttons 20 vibrant buttons with plug-and-play design for easy setup. Power Output Design 3x 5V outputs to support additional LED devices. Color Options Popular colors to enhance the aesthetics of your arcade machine.
Get It From Amazon Now: Check Price on Amazon & FREE Returns
Why the Raspberry Pi Arcade Machine Kit is a Game-Changer for Me
As someone who has always had a passion for gaming and technology, the Raspberry Pi Arcade Machine Kit has truly transformed my experience. First and foremost, it allows me to dive deep into the world of retro gaming, bringing back the nostalgia of classic arcade games right into my living room. The simplicity of setting it up means I can start playing my favorite titles almost instantly, without the hassle of complicated installations or configurations.
Moreover, this kit is an incredible learning tool. By assembling the arcade machine myself, I’ve gained valuable insights into electronics and programming. I found myself exploring different software options and customizing my gaming experience, which not only enhanced my skills but also sparked a newfound interest in DIY projects. It’s satisfying to see my hard work pay off as I enjoy the fruits of my labor.
Additionally, the Raspberry Pi Arcade Machine Kit has become a fantastic way to bond with friends and family. I’ve hosted game nights where we all reminisce about the games we played as kids, and it’s amazing to see everyone light up with excitement. This kit has fostered connections and created lasting memories, making it much more than just a gaming device—it’s a centerpiece of fun and together
Buying Guide for Raspberry Pi Arcade Machine Kit
Introduction
When I first decided to build my own arcade machine, I was excited yet overwhelmed by the options available. A Raspberry Pi Arcade Machine Kit caught my attention due to its versatility, affordability, and the joy of DIY. This guide is based on my experience and aims to help you navigate the buying process.
Understanding the Components
One of the first things I learned was that a typical Raspberry Pi Arcade Machine Kit consists of several key components. These include the Raspberry Pi board, a power supply, arcade buttons, a joystick, and a display. Knowing what each component does helped me make informed decisions while shopping.
Choosing the Right Raspberry Pi Model
There are various Raspberry Pi models available, and I found that the Raspberry Pi 3 or 4 are popular choices for arcade projects. The model I chose affected the performance of my arcade games, especially in terms of speed and graphics. It’s essential to consider the types of games I wanted to play and select the model accordingly.
Assessing the Display Options
The display was another crucial factor in my arcade build. I had to choose between a small LCD screen or a larger monitor. I realized that the size of the display would impact the overall look of my arcade machine. Additionally, I considered the resolution and compatibility with the Raspberry Pi to ensure a smooth gaming experience.
Exploring Control Options
The control setup was one of my favorite parts to research. I learned about different types of arcade buttons and joysticks. I had to decide whether I wanted a traditional arcade layout or something more modern. The feel and responsiveness of the controls significantly enhanced my gaming experience.
Software Considerations
Choosing the right software was a game-changer for me. I discovered several emulators compatible with the Raspberry Pi, which allowed me to play classic games. I had to ensure the software I chose was user-friendly and suitable for the games I wanted to emulate.
Building the Cabinet
The cabinet design was an exciting phase of my project. I had the option to buy a pre-made cabinet or build one from scratch. I found that creating a custom cabinet allowed me to express my personality and preferences. I carefully considered the materials and dimensions to ensure everything fit well.
Budgeting for the Project
Setting a budget was essential for my arcade machine build. I realized that while kits can be affordable, costs can add up quickly with additional components. I made a list of everything I needed and researched prices to stay within my budget while still achieving the look and functionality I wanted.
Community and Resources
I tapped into various online communities and resources during my build. Forums, YouTube tutorials, and blogs provided invaluable insights and troubleshooting tips. Engaging with others who shared similar interests helped me gain confidence in my project.
Conclusion
Building a Raspberry Pi Arcade Machine was a rewarding experience for me. By understanding the components, making informed choices, and tapping into available resources, I successfully created a machine that brought back the nostalgia of my favorite arcade games. I hope this guide helps you embark on your own arcade journey!
Author Profile
-
Welcome to Emma Belle's Cafe, I'm Emma Myers, the owner and your host at this charming spot in Chatham, Massachusetts. My journey into the café industry has been driven by a deep-rooted passion for entrepreneurship and a commitment to exceptional hospitality. At Emma Belle’s Cafe, we pride ourselves on creating a warm and welcoming environment where everyone feels part of the community.
In 2025, I expanded my horizons to include blogging about personal product analysis and first-hand usage reviews. This new venture allows me to share comprehensive reviews and valuable insights on a variety of products that can enhance your daily life. My blog covers everything from innovative kitchen tools and eco-friendly home products to the latest technological gadgets that can improve your efficiency at home and work.
Latest entries
- March 11, 2025Personal RecommendationsWhy I Switched to a 34-Inch Ultra Wide Monitor: My Game-Changing Experience and Expert Insights
- March 11, 2025Personal RecommendationsWhy I Chose a 6-Inch Twin Memory Foam Mattress: My Personal Experience and Expert Insights
- March 11, 2025Personal RecommendationsHow I Successfully Replaced the Glass on My LG LDE4413: A Step-by-Step Guide
- March 11, 2025Personal RecommendationsWhy Old Spice Classic After Shave is My Go-To for Timeless Grooming: A Personal Journey